The best ice fishing trip from Denmark is not about finding the closest lake, but making a strategic choice between convenience and wilderness.
- Sweden offers unmatched accessibility for weekend trips, with reliable perch and pike fishing in Småland, just hours from Copenhagen.
- Norway requires a longer journey but provides access to pristine arctic char lakes, offering a more remote and rewarding experience.
Recommendation: Your choice depends on your “travel-to-fish ratio”: prioritize Southern Sweden for quick, reliable sessions, but plan for Norway for a true wilderness expedition.
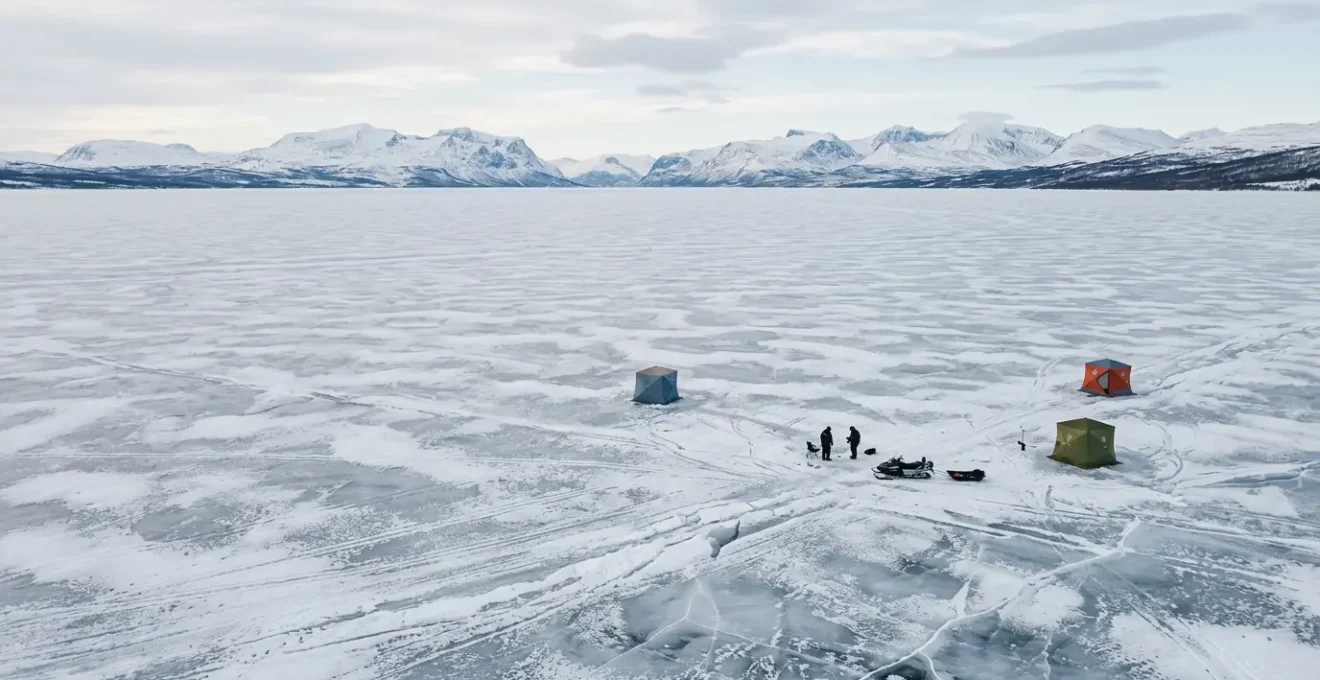
For the Danish angler, winter can feel long. The landscape is flat, the seas are often too rough, and the unique silence of fishing on a vast, frozen lake is a distant dream. The immediate solution that comes to mind is a quick drive across the Øresund Bridge into Southern Sweden. This is the common advice, and for good reason—it’s convenient. But what if the closest trip isn’t the best one for you? The true decision for a dedicated angler is more nuanced. It’s a logistical trade-off between the accessible convenience of Swedish perch and pike lakes and the more remote, challenging, but deeply rewarding arctic char waters of Norway.
This isn’t just a list of destinations; it’s a strategic guide. We’re moving beyond simple mileage to evaluate the entire experience. This involves understanding the critical safety protocols, the right gear for sub-zero temperatures, and the specific techniques that turn a cold day into a successful one. We will weigh the travel-to-fish ratio, helping you decide whether a short, productive trip to Småland is a better fit than a longer, more adventurous expedition deeper into the Scandinavian wilderness. Your perfect ice fishing trip starts with understanding this fundamental choice.
This guide breaks down every critical aspect of planning your ice fishing expedition from Denmark. From the essential safety checks on ice thickness to the legalities of cooking your catch on the lake, we provide the technical details you need to make an informed choice between Sweden and Norway.
Summary: Sweden or Norway: Your Complete Ice Fishing Planner
- Auger Safety: How to Drill Through 30cm of Ice Without Injury?
- The 10cm Rule: How to Know If the Lake Is Safe to Walk On?
- Maggots or Lures: What Works Best for Arctic Char Under the Ice?
- Heated Tents: Is It Cheating to Fish from a Warm Shelter?
- Fire on Ice: How to Grill Your Catch Immediately on the Frozen Lake?
- Seal Skin or Gore-Tex: What Clothing Do You Need for -20 Degrees?
- Seatrout Fishing: Do You Need a License to Cast from the Shore?
- Dry Suit Diving: How to Prepare for Your First Cold Water Dive?
Auger Safety: How to Drill Through 30cm of Ice Without Injury?
Your first action on the ice is to drill a hole. This is where your interaction with the frozen world begins, and it demands respect and proper technique. A power auger, whether gas or electric, is a formidable tool capable of cutting through thick ice in seconds, but it can also cause serious injury if mishandled. The key is not brute force, but controlled and steady pressure. Many beginners make the mistake of pushing down too hard, causing the auger to bind or jerk violently, which can lead to wrist or back injuries. You must let the machine do the work.
Before you even start the engine, ensure your footing is stable and clear of any loose snow or gear. Hold the auger firmly with both hands, keeping your body balanced. When you begin drilling, especially as you break through the final layer of ice, the resistance will suddenly vanish. This is the most critical moment. You must be prepared for this change to prevent the auger from lurching downwards or kicking back. Controlling the speed and maintaining a firm grip throughout the entire process is non-negotiable. Always wear protective gear, including sturdy gloves and waterproof boots, and never operate an auger without the blade guard in place when not drilling.
Taking short breaks, especially when drilling multiple holes, helps reduce fatigue and ensures you maintain the focus required for safe operation. A sharp blade is also a safe blade; a dull auger requires more force, increasing the risk of an accident.
The 10cm Rule: How to Know If the Lake Is Safe to Walk On?
Before you even think about drilling, your absolute first priority is confirming the ice is safe to walk on. The most widely accepted guideline is the “10cm rule.” For clear, solid, new ice, a minimum thickness of 10 centimeters (approximately 4 inches) is required for a person to walk on safely. This is not a guess; it’s a measurement you must verify yourself. Never trust that because you see tracks, the ice is safe. Conditions can vary dramatically across a single lake due to currents, underwater springs, or vegetation.
The best tools for checking ice thickness are an ice chisel (spud bar) or your auger. As you first venture out from the shore, check the ice every few steps. A good spud bar technique is to strike the ice with a firm, downward motion. If you can’t break through with one or two solid hits, the ice is likely thick enough. Official guidelines from organizations like the Swedish Ice Safety Advisory recommend 10 cm of core ice for walking, but this number increases for groups, snowmobiles, or cars. Remember, white or “snow ice” is only about half as strong as clear, black ice, so you’ll need double the thickness for the same level of safety.
Continuously monitoring ice thickness is not a one-time check. As you move across the lake to different fishing spots, repeat the process. Your life depends on it.
Maggots or Lures: What Works Best for Arctic Char Under the Ice?
Once you’re safely set up over a promising spot, the great debate begins: live bait or artificial lures? For arctic char (röding in Swedish), one of the most prized catches of the Scandinavian winter, the answer depends on their metabolism. In the cold, dark water beneath the ice, fish conserve energy. Their movements are slow and deliberate, and they are less likely to chase a fast-moving presentation. This is why slow jigging techniques are paramount.
Live bait, like maggots (pimpelmaggot), is often the most reliable choice. Tipped onto a small, brightly colored jig or a simple hook, their subtle wiggling provides a natural scent and movement that even lethargic char find hard to resist. The classic setup involves a small jigging rod, light line (8 to 20-pound test is usually sufficient), and a delicate touch. You’re not aggressively ripping the lure; you’re imparting small twitches and long pauses, allowing the bait to do the work.
However, lures can be incredibly effective, especially for attracting fish from a distance. The key is to match the local forage. As the Cast and Spear Fishing Guide notes, flash and color are your allies in the dim light under the ice.
Flashy spoons (like the Blue Fox Pixie with a pink/orange center) and inline spinners are deadly. Brightly colored streamers (pink, orange, white) that imitate small fish are a top choice.
– Cast and Spear Fishing Guide, Arctic Char: How to Catch It & The Secret to Crispy Skin
Ultimately, the best approach is to come prepared with both. Start with a flashy spoon to draw attention, and if you mark fish on your sonar that won’t commit, switch to a jig tipped with maggots for a more finesse presentation.
Heated Tents: Is It Cheating to Fish from a Warm Shelter?
The traditional image of ice fishing is one of stoic endurance: an angler perched on a bucket, braving the biting wind in the name of the catch. But modern gear offers a different path. Portable, heated ice fishing shelters have transformed the sport, turning a test of survival into a comfortable, strategic pursuit. This raises a philosophical question among anglers: is fishing from a warm, cozy tent really “cheating”? The purist might argue it removes the element of raw nature and challenge. But the pragmatist sees it differently.
A heated shelter is not about avoiding the outdoors; it’s about extending your time in it. By providing a refuge from wind and extreme cold, a tent allows you to stay on the ice longer, fish more effectively, and remain focused. Inside a warm shelter, your hands don’t go numb, allowing for better knot-tying and more sensitive bite detection. You can operate an electronic fish-finder without the screen freezing over. It turns ice fishing from a sprint of a few hours into a comfortable, day-long marathon. This is especially true when fishing with family or introducing someone new to the sport.
Ultimately, ice fishing is about connecting with the environment and the pursuit of fish. If a shelter enhances your ability to do that safely and for a longer period, it’s not cheating—it’s a strategic advantage. It embodies the Scandinavian philosophy of friluftsliv (open-air living): enjoying nature in all conditions, smartly and comfortably.
Fire on Ice: How to Grill Your Catch Immediately on the Frozen Lake?
There is no greater reward after a cold day of ice fishing than grilling your fresh catch right on the lake. The smell of woodsmoke mingling with the crisp winter air is an elemental experience. However, lighting a fire on a frozen lake is a serious responsibility that is governed by both safety and law, particularly in Sweden, where the Right of Public Access (Allemansrätten) is often misunderstood.
The most critical rule is to never build a fire directly on the ice. The heat will quickly melt the ice, potentially creating a dangerous weak spot or causing your fire and grill to plunge into the water. Always use a portable fire pit or a grill on legs that keeps the heat source elevated and contained. Furthermore, the right to roam does not grant an unconditional right to a fire. As the Swedish Civil Defence and Resilience Agency clearly states, personal responsibility is paramount.
The Right of Public Access (Allemansrätten) grants no automatic right to light a fire. A fire is your personal responsibility and should only be lit in safe conditions.
– Swedish Civil Defence and Resilience Agency, Lighting Fires and the Right of Public Access
This means you must first check for local fire bans (eldningsförbud), which are common during dry periods. Once you’ve confirmed it’s safe, the principle of “leave no trace” is absolute. Everything you bring—charcoal, ash, food scraps—must be packed out with you. The following checklist ensures you conduct your on-ice grill safely and responsibly.
Action Plan: Safe On-Ice Fire and Grilling Protocol
- Check for fire bans: Find out current fire risk levels on municipality websites or at local tourist offices before lighting any fire.
- Never build fire directly on ice: Always use a portable fire pit or grill to protect the ice from heat and prevent melting through.
- Use designated locations: Allemansrätten states that making fires is allowed in the Swedish countryside but only when conditions are safe and in appropriate locations.
- Choose proper surface: If on land, use gravel or sand as a base; do not make fires on stony outcrops or directly on rock surfaces.
- Keep fire under control: Keep an eye on the fire at all times and make sure it’s completely extinguished with water or snow before you leave.
- Leave no trace: Remove all charcoal, ash, and cooking debris; everything you brought must come home with you.
By respecting these guidelines, you can enjoy the profound satisfaction of a shore lunch, turning a good day of fishing into an unforgettable memory.
Seal Skin or Gore-Tex: What Clothing Do You Need for -20 Degrees?
The difference between a miserable trip and a successful one often comes down to clothing. When temperatures plummet to -20°C (-4°F), your gear isn’t about fashion; it’s about survival. While traditional materials like seal skin and wool have been used for centuries by indigenous Arctic peoples for their incredible insulating properties, modern technical fabrics like Gore-Tex offer a different kind of advantage: moisture management.
The most effective strategy for staying warm is the layering system. This consists of three distinct layers that work together to keep you warm and dry.
- Base Layer: This is the layer directly against your skin. Its job is to wick sweat away from your body to keep you dry. Cotton is your worst enemy here; it absorbs moisture and chills you. Opt for synthetics (like polyester) or, even better, merino wool, which insulates even when damp.
- Mid-Layer: This is your insulation layer. Its purpose is to trap body heat. Fleece, down, and synthetic puff jackets are all excellent choices. The thickness of this layer can be adjusted based on your activity level and the outside temperature. It’s better to have two thinner mid-layers than one bulky one, as this gives you more control.
- Outer Layer (Shell): This is your protection from the elements. It must be both windproof and waterproof. This is where fabrics like Gore-Tex excel. A good shell will block wind and snow while still allowing the moisture wicked by your base layer to escape. A non-breathable shell (like simple PVC rain gear) will trap sweat, leaving you wet and cold from the inside.
Don’t forget your extremities. A warm hat is crucial, as you lose a significant amount of heat through your head. Insulated, waterproof boots are non-negotiable, and a good pair of gloves or mittens (mittens are generally warmer) will protect your hands. Layering isn’t just for your torso; wearing a thin liner sock under a thick wool sock can make a world of difference.
The “seal skin or Gore-Tex” question is a false dichotomy. The modern, effective solution is to combine the timeless wisdom of wool (as a base layer) with the advanced technology of a synthetic mid-layer and a breathable, waterproof shell.
Seatrout Fishing: Do You Need a License to Cast from the Shore?
While the title mentions seatrout, a coastal pursuit, the fundamental question of licensing is paramount for any angler heading to Sweden from Denmark, especially for freshwater ice fishing. The rules can seem complex, but they are generally straightforward once you understand the basic principles of Allemansrätten (The Right of Public Access) and the distinction between public and private waters.
The simple rule is this: fishing along Sweden’s entire coastline and in its five largest lakes (Vänern, Vättern, Mälaren, Hjälmaren, and Storsjön) is generally free and does not require a license. However, for virtually all other freshwater lakes—the very lakes you will be ice fishing on in places like Småland—you are required to purchase a fishing permit, known as a fiskekort. This permit is specific to a particular lake or a defined fishery area (a fiskevårdsområde). Fishing without a valid fiskekort is a serious offense.
Fortunately, purchasing a license is easier than ever. Many are available online through websites and apps like iFiske, or can be bought at local gas stations, tourist offices, or sporting goods stores near your destination. The following table breaks down the core requirements for fishing in Sweden, which is the most likely destination for a short trip from Denmark. A trip to Norway would have its own set of national and local regulations to investigate.
| Fishing Type | Location | License Required? | Details |
|---|---|---|---|
| Freshwater ice fishing | Most Swedish lakes | Yes (fiskekort) | Permit required for specific lake or water body |
| Saltwater coastal fishing | Swedish coast | Often free | Some restrictions apply; check local regulations |
| Five large lakes exception | Vänern, Vättern, Mälaren, Hjälmaren, Storsjön | No | Included in Allemansrätten (Right of Public Access) |
| Digital permit management | Sweden | Via apps/websites | Use platforms like iFiske for easy license purchase |
Always double-check the specific rules for your chosen lake, as there can be local regulations regarding catch limits, minimum sizes, and protected species. Being a responsible angler means respecting the rules that sustain the fishery for everyone.
Key Takeaways
- Ice safety is paramount: Never go on ice less than 10cm thick, and always check it yourself.
- Effective clothing is based on a three-part layering system: a wicking base, an insulating mid-layer, and a waterproof/windproof shell.
- For most Swedish lakes, a local fishing permit (fiskekort) is mandatory and can be easily purchased online.
Dry Suit Diving: How to Prepare for Your First Cold Water Dive?
While the title mentions the specialized world of dry suit diving, the core principles of preparing for cold water immersion are universally critical for any ice angler. The greatest risk you face on a frozen lake is not the cold itself, but the shock of unexpectedly ending up in it. Falling through the ice is a life-threatening emergency, and your survival depends entirely on preparation and a calm, practiced response.
The initial cold shock can cause an involuntary gasp, leading to drowning if your head goes under. It’s vital to remain calm and control your breathing. Your primary goal is to get out of the water as quickly as possible, as you can lose dexterity in your hands in as little as one minute. This is where essential safety gear comes into play. A pair of ice picks (worn around your neck for easy access) are your most important tool. They allow you to grip the slippery ice edge and pull yourself out.
The buddy system is non-negotiable. Never go onto the ice alone. Having a friend nearby, equipped with a throw rope, can be the difference between a close call and a tragedy. Before you leave, make sure someone on shore knows your plans and when you expect to return. Finally, avoid alcohol. While a flask might seem like a good way to stay warm, alcohol impairs your judgment, accelerates heat loss, and slows your reaction time—a deadly combination in an emergency.
Your preparation is your lifeline. A life jacket or flotation suit, a set of ice picks, a cell phone in a waterproof case, and a rope are not optional extras; they are the essential tools of a responsible ice angler.