In summary:
- The key to avoiding exhaustion is not just physical fitness, but a strategy of “energy economy”—managing your effort to enhance the entire day’s experience.
- Master the ascent with the “Rest-Step Interval Method”: climb 20 steps, then pause for 10 deep breaths to control your heart rate.
- Plan your visit around “geological timing”: understand when the cliffs are safest and the water is most beautiful to maximize your reward.
- Your conserved energy is your ticket to other world-class experiences, like finding 70-million-year-old fossils and seeing the Milky Way from a Dark Sky Park.
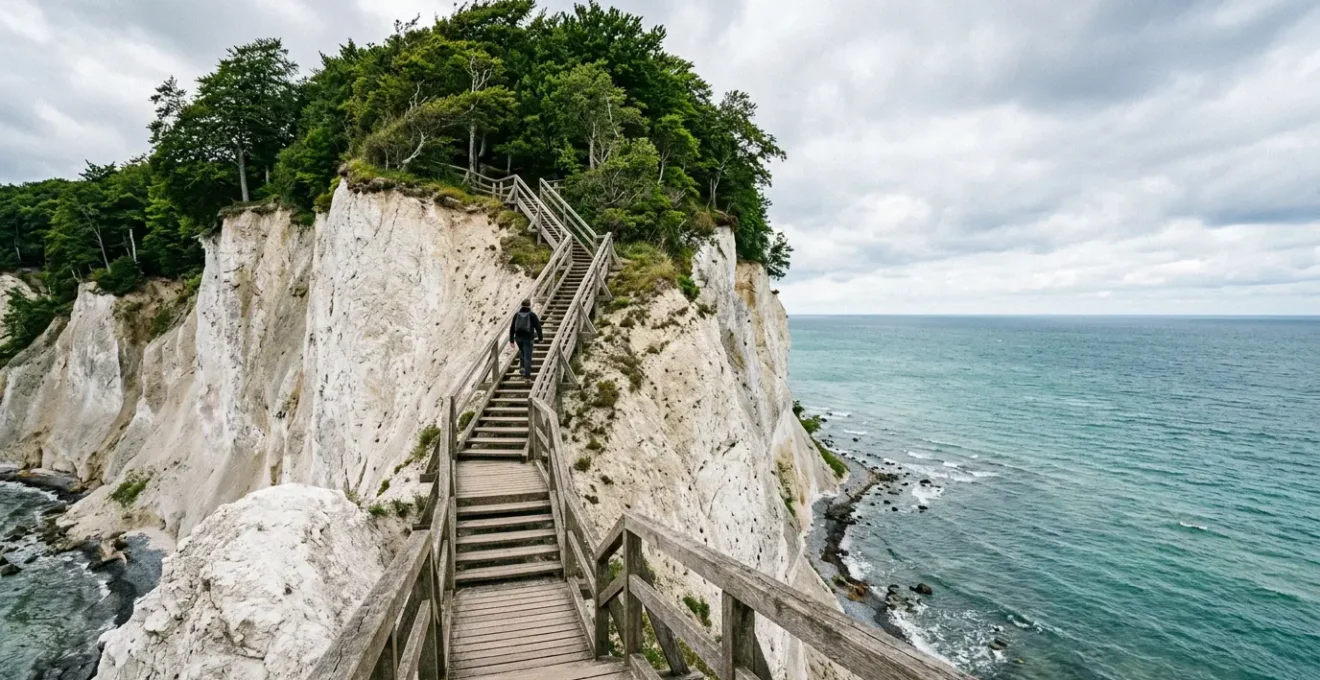
So, you’re staring down the legendary staircase at Møns Klint. The challenge isn’t just the 497 steps; it’s the steep vertical drop to a wild, geological wonderland and the burning question of how you’ll ever make it back up. Many visitors arrive, see the stairs, and their adventure is immediately framed by one thought: exhaustion. They focus on simply surviving the climb, which means they miss the magic. Access to the cliffs is free, and facilities like toilets and the main GeoCenter are conveniently located at the top, but the real treasure requires a descent.
Most guides will offer generic advice: “be in good shape” or “take your time.” But as a ranger, I’m telling you that’s not enough. The secret to Møns Klint isn’t about brute force; it’s about mastering the landscape with a tactical mindset. It’s about an economy of energy. What if the goal wasn’t to just get back to your car without collapsing, but to finish the climb feeling energized enough to hunt for fossils, photograph turquoise waters, and stay out late to witness the cosmos in one of the world’s best Dark Sky Parks?
This is not a simple hiking guide. This is a mission briefing. We’re going to reframe the entire experience. We’ll break down the tactical pacing needed to conquer the ascent, the geological timing required for safety and beauty, and how to manage your energy budget to unlock the incredible rewards that await at both the top and bottom of these magnificent chalk cliffs. Let’s get you ready to not just climb, but to truly experience Møns Klint.
In this guide, we’ll cover the full operational plan for your visit. From the prehistoric rewards on the beach to the celestial wonders above, you’ll learn how to turn this physical challenge into an unforgettable journey through deep time.
Summary: Your Mission Briefing for Møns Klint
- Belemnites and Urchins: How to Find 70-Million-Year-Old Fossils on the Beach?
- Dark Sky Park: Why Is Møn the Best Place to See the Milky Way?
- 497 Steps Down: Are You Fit Enough to Get Back Up from the Beach?
- When Is It Dangerous to Walk Under the Cliffs?
- Turquoise Waters: Which Season Turns the Baltic Sea Tropical Blue?
- North Sea vs Baltic: Which Coast Offers the Most Dramatic Waves?
- Solo vs Guided: Should You Attempt a Night Hike in Mols Bjerge Alone?
- Dyrehaven by Night: Is It Safe to Walk Among 2000 Deer in the Dark?
Belemnites and Urchins: How to Find 70-Million-Year-Old Fossils on the Beach?
Alright, let’s talk about the first part of your reward for making the descent: treasure hunting. The beach below Møns Klint is not just sand and pebbles; it’s a graveyard and a time capsule. The white chalk cliffs are composed of the microscopic skeletons of creatures that lived here when this was a tropical sea. Every landslide and bit of erosion exposes a fresh batch of history. You are walking on the remains of a 70-million-year-old seabed, and with the right technique, you can find tangible pieces of that ancient world.
Finding fossils here is a game of pattern recognition, not brute force. Forget digging; that’s prohibited and unnecessary. Your targets are belemnites (the fossilized internal shell of an ancient squid-like creature, looking like a brownish, bullet-shaped stone) and sea urchins. The key is to train your eyes to look for shapes and textures that stand out from the random, chaotic flint stones. Look for symmetry, for the distinct cone of a belemnite, or the star-like patterns on a fossilized urchin.
To maximize your chances, focus your search in the right areas and with the right mindset. Here’s your tactical approach:
- Target Fresh Debris Fields: Look for the lighter-colored chalk deposits at the base of the cliffs. These are signs of recent, smaller slides and are where newly exposed fossils are most abundant. Keep a safe distance from the cliff face itself.
- Develop a Paleontologist’s Eye: It’s all about spotting order in chaos. Look for the distinct conical shape of belemnites or the symmetrical rows of dots on sea urchins, which mark where their spines were attached. A small spray bottle of water can work wonders to reveal details on a dry, dusty stone.
- Practice Ethical Collection: You are welcome to collect common fossils you find on the beach surface. However, using tools like picks or hammers is strictly forbidden. If you believe you’ve found something truly exceptional, don’t just pocket it. Report it to the staff at the GeoCenter. It could be a ‘danekræ’—a national treasure!
Think of this as the first return on your energy investment. The effort to get down to the beach is paid back in the thrill of holding a piece of deep time in your hand.
Dark Sky Park: Why Is Møn the Best Place to See the Milky Way?
After you’ve conquered the stairs and returned to the top, your day isn’t over. In fact, if you’ve managed your energy correctly, the main event is about to begin. The islands of Møn and Nyord are designated as Scandinavia’s first official Dark Sky Park. This means light pollution is so minimal that on a clear, moonless night, you can see the universe in a way most people never will. We’re talking about up to 5,000 stars visible with the naked eye, compared to a few hundred in a typical suburban area. The Milky Way isn’t a faint smudge; it’s a brilliant, textured band of light arcing across the sky.
The reason Møn is exceptional is its unique combination of darkness and environment. You’re not just in a dark field; you’re standing atop a massive chalk cliff or on a beach with the vast, dark expanse of the Baltic Sea before you. There are no city glows on the horizon. This is where your smart energy management pays off. A grueling, exhausting climb leaves you wanting nothing but your bed. A strategic climb leaves you invigorated and ready for a cosmic spectacle.
To transform your post-hike fatigue into stargazing readiness, you need a recovery plan. This isn’t about just resting; it’s about active, strategic recovery.
- Schedule a Recovery Window: Plan for a 2-3 hour period after your climb. This is the time for a protein-rich meal and electrolyte replenishment. This isn’t a luxury; it’s refueling for the next phase of your mission.
- Take a Strategic Power Nap: A 45-60 minute nap in the late afternoon can work wonders. It’s long enough to restore energy but short enough to avoid disrupting your nighttime alertness. Set an alarm!
- Gear Up for the Cosmos: You don’t need a massive telescope. A simple pair of 7×50 or 10×50 binoculars will dramatically enhance the view, revealing the craters of the Moon, the moons of Jupiter, and the faint glow of the Andromeda Galaxy.
- Embrace the Cosmic Soundscape: The ultimate experience is to head back down to the beach (or find a safe spot on top). The sound of the Baltic waves creates a natural, meditative soundtrack. This sensory immersion—the combination of sight and sound—is what makes stargazing at Møn utterly unique.
This is the pinnacle of peak experience engineering. You use the day’s physical challenge as a gateway to a profound nighttime experience that connects you to the entire universe.
497 Steps Down: Are You Fit Enough to Get Back Up from the Beach?
This is the heart of the mission. The 497 steps of the Maglevandstrappen aren’t just a number; they represent a significant physical challenge with a vertical elevation gain of up to 128 meters at the highest point of the cliffs, Dronningestolen (the Queen’s Chair). The question isn’t just “are you fit?” but “do you have the right technique?” I’ve seen incredibly fit people struggle because they attack the stairs with brute force, and I’ve seen people of average fitness ascend with a smile because they used a smart strategy. The key is tactical pacing, not raw power.
Your enemy is lactic acid buildup and a skyrocketing heart rate. A sprint-and-gasp approach will leave your muscles burning and your lungs screaming for air halfway up. The goal is to maintain a steady, sustainable effort that keeps you below your anaerobic threshold. You need to turn the climb from a single, overwhelming ordeal into a series of manageable micro-challenges. This mental shift is just as important as the physical technique.
Forget everything you think you know about climbing stairs. We’re going to use a method that prioritizes rhythm and recovery, ensuring you reach the top with energy to spare.
Action Plan: The Møn Klint Method for Ascending 497 Steps
- The Rest-Step Interval Method: This is your core tactic. Climb 20 consecutive steps at a moderate, steady pace. Then, pause at the landing for 10 deep, diaphragmatic breaths. Focus on breathing out fully. This rhythm actively manages your heart rate and prevents premature muscle fatigue. Do not wait until you are exhausted to rest; rest proactively.
- Mind Over Muscle with Chunking: Do not look at the top. Your brain will register the immense distance and signal fatigue. Instead, focus exclusively on reaching the next visible landing. Use these natural platform breaks as designated ‘reward points’ to mentally reset. Celebrate each small victory.
- Pre-Hike Strength Preparation: If you have time, prepare at home. A simple 2-week program of box step-ups, calf raises, and eccentric squats (focusing on the slow, downward motion) will target the exact muscle groups used for stair climbing and make a massive difference.
- Strategic Use of Benches: The benches along the staircase are not just for collapse. Use them as structured interval checkpoints. Even if you don’t feel tired, stand for 30 seconds at each one. This prevents your legs from stiffening up during a seated rest and keeps your momentum.
By adopting this methodical approach, you are no longer a victim of the stairs. you are the commander of your own ascent. You control the pace, the effort, and the outcome.
When Is It Dangerous to Walk Under the Cliffs?
Before you even think about taking that first step down, you need a crucial safety briefing. Møns Klint is a living, breathing, and constantly changing geological formation. The same forces that expose those incredible fossils—erosion and collapse—also pose the single greatest risk to visitors. A major landslide in January 2024 was the largest in over 15 years, creating a new peninsula into the sea. This is not a static monument; it’s an active environment, and your safety depends on your ability to read its warning signs.
The primary danger is a cliff fall, which can happen with little to no warning. However, the risk is not random. It is significantly increased by specific weather conditions. Water is the enemy of chalk. When water seeps into the cliff face, it acts as a lubricant. When it freezes and thaws, it expands and fractures the chalk from within. Your number one job as a responsible hiker is to assess the conditions before you descend.
You must learn to see the cliffs not just as a beautiful backdrop, but as a dynamic system. Here are the visual cues you need to look for from a safe distance on the beach:
- Fresh Vertical Cracks: Look for new, clean-edged vertical fissures in the chalk. These are clear indicators of structural weakness and potential imminent collapse. Stay far away.
- Large Debris Cones: A large, cone-shaped pile of fresh, bright white chalk at the foot of the cliff means something has already fallen recently. Where there’s been one slide, another can follow. Maintain a distance of at least 50 meters from these areas.
- Wet Patches and Seepage: Dark streaks of moisture on the cliff face are a major red flag. This shows that water is infiltrating the chalk, dramatically increasing the risk of a landslide.
- The Danger Trifecta: The absolute highest risk period is during or immediately after the combination of three conditions: heavy rainfall (within the last 48 hours), a recent freeze-thaw cycle, and strong onshore winds. If these conditions are present, do not go on the beach.
Respecting the power of the cliffs is non-negotiable. No fossil or photograph is worth your life. Always check the local weather forecast and be prepared to change your plans.
Turquoise Waters: Which Season Turns the Baltic Sea Tropical Blue?
One of the most breathtaking sights at Møns Klint is the color of the water. On certain days, the normally dark Baltic Sea transforms into a shocking, almost tropical, milky turquoise. This isn’t an illusion; it’s a beautiful biological and geological event. Understanding the “why” behind this phenomenon is key to planning your visit to witness it. This is a perfect example of geological timing.
The magic is a combination of the cliffs themselves and microscopic life in the sea. The chalk cliffs are constantly eroding, releasing fine white particles into the water. This provides the ‘paint’. The ‘artists’ are tiny marine algae called coccolithophores, which have calcite plates. When conditions are right, they bloom in massive numbers, and the combination of suspended chalk and their light-scattering plates turns the water its signature turquoise hue.
Case Study: The Coccolithophore Bloom Phenomenon
The cliffs are made from the shells of coccolithophores that lived over 70 million years ago. Today, their living descendants feed on the dissolved chalk from that erosion. This creates a feedback loop: cliff erosion feeds the bloom, and the bloom’s light-scattering properties make the water appear a vibrant, milky turquoise. This natural spectacle is most pronounced during the late spring and summer, when rising water temperatures and nutrient levels trigger the massive algal blooms, transforming the dark Baltic into a ‘tropical’ palette.
Catching this phenomenon at its peak requires not just the right season, but the right gear and technique to capture its beauty. Despite the tropical appearance, be warned: the Baltic Sea here remains a brisk 16-19°C (60-66°F) even in summer. It’s perfect for a quick, invigorating dip after your hike, but not for a long swim. For photographers, here’s how to get the shot:
- Use a Polarizing Filter: This is non-negotiable. A circular polarizing filter (CPL) on your camera or phone is essential. It cuts through the surface glare and dramatically intensifies the subsurface turquoise color.
- Find the Optimal Angle: Don’t shoot straight down at the water. Position yourself at a 30-40 degree angle to the surface; this is where a polarizer has its maximum effect.
- Shoot at Midday: The best light for capturing water color is often between 11 am and 2 pm. The high sun penetrates deep into the water column, creating the best contrast between the white chalk, the turquoise sea, and the blue sky.
Timing your visit for late spring or summer not only increases your chances of seeing this spectacle but also provides the long daylight hours needed for a full day of exploration.
North Sea vs Baltic: Which Coast Offers the Most Dramatic Waves?
As a hiker in Denmark, understanding the character of its coastlines is key. Møns Klint gives you a quintessential Baltic Sea experience: serene, contemplative, and enclosed. The waves are often gentle, creating a meditative lapping sound that’s perfect for the sensory immersion of fossil hunting or stargazing. But Denmark is a country defined by two seas, and the other side of the coin is the wild, untamed North Sea. For hikers seeking drama, energy, and the roar of the ocean, the west coast is the destination.
The difference comes down to a single geographical factor: fetch. This is the distance over which wind can blow uninterrupted across a body of water to build waves. The Baltic is an enclosed sea with a short fetch. The North Sea, on the other hand, is open to the vast expanse of the Atlantic Ocean. This fundamental difference creates two entirely different coastal experiences for the hiker and nature lover.
This comparative table breaks down the key differences for a hiker deciding where to go for their coastal experience.
| Characteristic | Baltic Sea (Møns Klint) | North Sea (Klitmøller ‘Cold Hawaii’) |
|---|---|---|
| Wave Energy | Low to moderate (enclosed sea) | High to extreme (open ocean exposure) |
| Fetch Distance | Short (~400 km maximum) | Long (unlimited Atlantic fetch) |
| Typical Wave Height | 0.5-1.5 meters | 2-4 meters (storm: 6+ meters) |
| Sound Experience | Gentle lapping, meditative | Powerful roar, energizing |
| Hiker’s Mood | Serene, contemplative, calming | Dramatic, exhilarating, dynamic |
| Beach Walking Safety | Generally safer (calmer conditions) | More hazardous (unpredictable swells) |
Neither experience is “better”—they are simply different. Møns Klint offers a unique combination of geological grandeur and coastal serenity. The North Sea coast, particularly in areas like Thy National Park, offers raw, elemental power. Your choice depends on the mood you’re seeking: the quiet awe of deep time at Møn, or the exhilarating energy of an open ocean at war with the shore.
Solo vs Guided: Should You Attempt a Night Hike in Mols Bjerge Alone?
The lure of a night hike, whether at a Dark Sky Park like Møn or in the rolling hills of Mols Bjerge National Park, is powerful. The world transforms after sunset. But venturing into the wild after dark, especially alone, requires a different level of preparation and self-awareness. While a guided tour offers a safety net, a successful solo night hike can be an incredibly rewarding experience, fostering self-reliance and a deeper connection to nature. The question is: are you ready for it?
The decision to go solo should be based on an honest assessment of your skills and gear, not just your enthusiasm. The darkness erases visual cues you rely on during the day. A simple trail can become a confusing maze. Your senses must adapt; your ears become your eyes, detecting the snap of a twig or the rustle of a deer long before you see anything. Comparing Møns Klint at night to Mols Bjerge is insightful: the open clifftops at Møn offer a vast celestial panorama, making navigation by starlight more feasible for a beginner. The enclosed forest canopy of Mols Bjerge, however, blocks out the sky and demands advanced trail-finding skills in near-total darkness.
Before attempting any solo night hike, you must be confident in your ability to be self-sufficient. This isn’t about being fearless; it’s about being prepared. Here is a non-negotiable confidence checklist:
- Backup Illumination: One headlamp is none. You must carry a primary headlamp (200+ lumens) and a fully-charged backup. At least one must have a red light mode to preserve your night vision.
- Offline Navigation: Your phone’s signal will fail. Download offline maps of the trail system to a GPS app *before* you leave and carry a waterproof paper map and compass as a tertiary backup. Technology can and will fail.
- Acoustic Wildlife Detection: Practice “sound mapping.” Stop every 10-15 minutes, turn off your light, and just listen for 60 seconds. Learn to identify the direction and distance of animal movements.
- Live Location Sharing: This is a modern safety essential. Share your real-time GPS location with a trusted contact via a smartphone app. Set the duration for longer than your planned hike time.
If you can tick every box on this list with confidence, you may be ready for a solo trip. If not, join a guided hike. There is no shame in building experience under the watch of an expert.
Key Takeaways
- Tackling Møns Klint is a strategic challenge, not just a physical one. Success lies in managing your “energy economy.”
- Master the 497-step ascent using the “Rest-Step Interval Method” to prevent burnout and enjoy the rest of your day.
- Your safety is paramount. Learn to read the cliff’s warning signs, especially after rain or freeze-thaw cycles, before descending to the beach.
Dyrehaven by Night: Is It Safe to Walk Among 2000 Deer in the Dark?
Venturing into nature at night offers a completely different perspective, and this is especially true in a place like Jægersborg Dyrehaven near Copenhagen. This isn’t a remote wilderness; it’s a managed forest park, but it is home to a massive population of around 2,000 free-roaming deer. Walking among them in the dark is an almost magical experience, but it requires a specific code of conduct. The goal is to observe without disturbing, to be a ghost in their world. Safety here isn’t just about you; it’s about the well-being of the animals.
The primary principle is to minimize your sensory footprint. Deer have incredible night vision and hearing, far superior to ours. A bright white headlamp beam is like a spotlight in their eyes, causing panic and stress. Loud talking or sudden movements can cause a herd to bolt, which can be dangerous for them and for you. Your mission is to use technology and technique to become an invisible observer. This requires strict light and sound discipline.
To walk safely and respectfully among the deer, you must adopt these protocols:
- Red Light Protocol: This is the most important rule. Use only the red LED mode on your headlamp. The 620-750nm wavelength of red light is far less disruptive to the night vision of deer and other nocturnal animals (and it preserves your own).
- Downward-Angled Beam: Never sweep your light horizontally across the landscape. Point your beam at the ground just a couple of meters in front of you. This illuminates your path without blinding or startling the wildlife.
- Acoustic Sound Mapping: As with any night hike, stop and listen. Stand motionless for two-minute intervals. You’ll hear the herds—their breathing, their movement through the grass—long before you see them. This allows you to choose your route to observe from a respectful distance.
- Slow Cadence Walking: When you know you are approaching a deer area, slow your pace dramatically. A deliberate, slow walk allows the animals to detect your presence calmly and move away at their own pace, rather than being frightened into a stampede.
Walking in Dyrehaven at night is a privilege. By following this code of conduct, you ensure the experience remains safe and sustainable for both humans and the magnificent deer that call the park home.
By adopting this strategic, respectful, and prepared mindset, you transform yourself from a simple tourist into a true explorer of Denmark’s natural wonders, from the ancient cliffs of Møn to the royal forests of Dyrehaven. Plan your mission, manage your energy, and get ready to experience these landscapes on a deeper level.