Success in cold water is not about enduring the cold; it’s about mastering the procedures that eliminate its risks.
- Your existing buoyancy skills are insufficient; you must build a new “buoyancy architecture” from scratch with systematic weight checks.
- An equipment failure like a regulator freeflow is not a catastrophe, but a manageable event if you have drilled the specific “sip-breathing” emergency protocol.
Recommendation: Treat your first dry suit dives as dedicated training sessions. Focus on mastering one skill at a time—weighting, then air management, then emergency drills—before you even consider a “fun” dive.
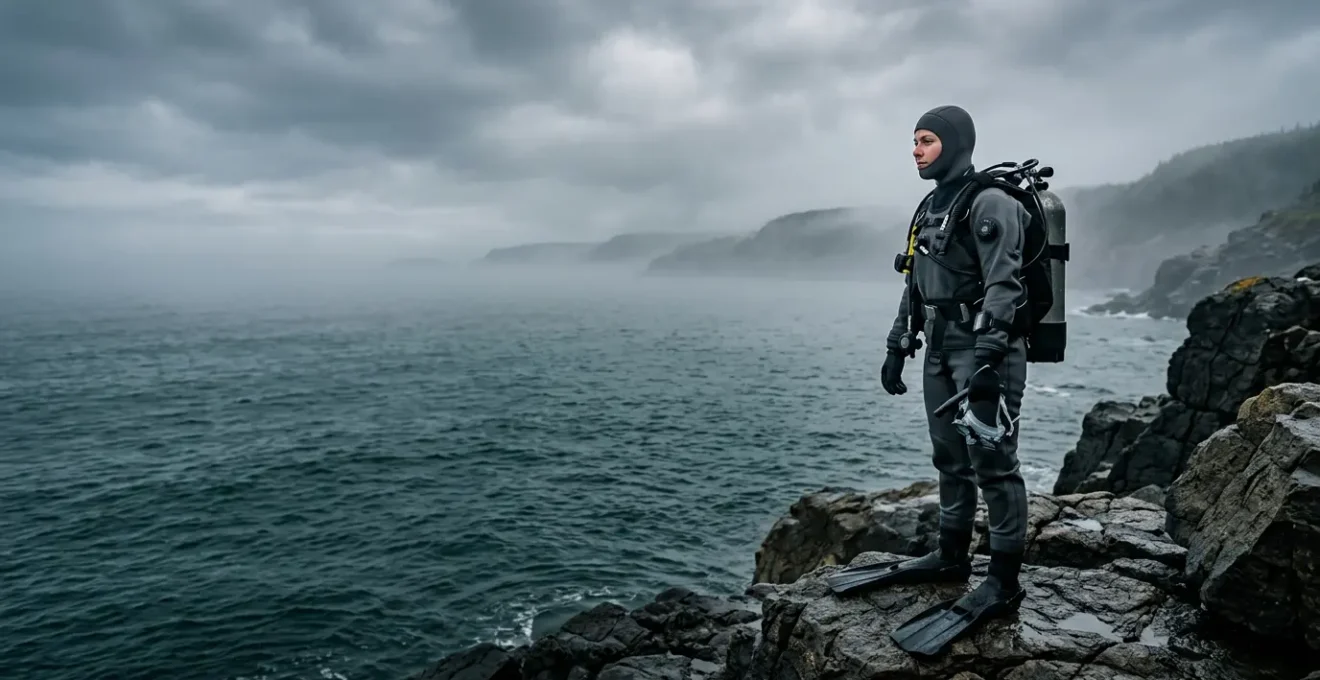
For a certified diver accustomed to the vibrant ease of warm-water reefs, the thought of plunging into the silent, steel-blue world of cold water is both thrilling and daunting. The gear is different, the environment is demanding, and the margin for error feels smaller. Many divers believe the challenge is simply about adding layers and lead. They are told to “stay warm” and “practice buoyancy,” but this advice barely scratches the surface. This superficial approach is what leads to frustration and, more importantly, to preventable incidents. The transition to cold water diving isn’t just about different equipment; it demands a fundamental shift in mindset.
The question of “how much harder is dry suit diving?” is the wrong one to ask. The right question is, “What new skills and discipline must I master?” This guide steps away from generic tips and focuses on the non-negotiable protocols that build a true cold-water mindset. It’s about transforming theoretical knowledge into ingrained muscle memory. We will deconstruct the core challenges—buoyancy, equipment failure, and thermal regulation—and provide you with the disciplined procedures to manage them with confidence. This isn’t just about surviving your first cold water dive; it’s about mastering the environment so you can truly appreciate its unique and stark beauty.
This article provides a structured approach to your preparation. We will cover the essential protocols, from calculating your weight requirements with precision to handling in-water emergencies and ensuring a safe, effective recovery after the dive. Follow these steps to build the discipline that underpins all safe cold-water exploration.
Table of Contents: Dry Suit Mastery: A Disciplined Protocol for Your First Cold Water Dive
- Thick Undergarments: How Much Extra Weight Do You Need for a Dry Suit?
- Freeflow: How to Breathe When Your Regulator Freezes in Cold Water?
- Lumpfish and Wolffish: What Marine Life Thrives in freezing temps?
- The Surface Interval: How to Regain Body Heat Safely After a Dive?
- Winter vs Summer: Is Visibility Better in the Coldest Months?
- Why Is the Baltic Sea Less Salty and How Does It Affect Your Swim?
- The Ærøsund: Is This Purpose-Sunk Wreck Good for Beginners?
- The Wrecks of the Øresund: Which Ships Can Recreational Divers Visit?
Thick Undergarments: How Much Extra Weight Do You Need for a Dry Suit?
The single most common mistake for a new dry suit diver is underestimating the radical change in their buoyancy profile. Your carefully logged weights from tropical diving are now irrelevant. You are not simply adding weight; you are constructing a completely new buoyancy architecture. Every element—the suit material, the volume of air inside it, and especially the thickness of your undergarments—creates positive buoyancy that must be precisely counteracted.
As a baseline, start by adding about 10% of your body weight, but this is just a starting point. A switch from a thin 150g undergarment to a thick 300g expedition-grade one can require an additional 2 lbs or more. Using aluminum tanks, which become more buoyant as you breathe them down, necessitates another 5 lbs to ensure you can maintain your safety stop at the end of the dive. The goal is to carry enough weight to be neutrally buoyant with a near-empty tank at your shallowest stop, and not an ounce more. Being over-weighted is just as dangerous as being under-weighted; it forces you to add more air to your suit, creating a large, unstable air bubble that can migrate and risk an uncontrolled ascent.
Forget guesswork. Mastery comes from procedural discipline. The only way to determine your correct weight is to perform a systematic weight check in the water with the exact gear configuration you plan to use. This isn’t a one-time task; it’s a protocol you must run every time you change a significant piece of gear, especially your thermal protection. Below is a foundational protocol for establishing your baseline weight.
Actionable Plan: Systematic Weight Check Protocol
- Establish a Baseline: Start with an initial estimate of 10% of your body weight plus additions for saltwater and tank type.
- Enter the Water: Fully equipped, enter water deep enough so you can’t stand up.
- Deflate All Air: Completely vent your BCD and dry suit. Hold the dump valve open to ensure all excess air is purged.
- Hold a Normal Breath: Float vertically and hold a normal breath, not a deep inhalation. Your body should float at eye level.
- Exhale Fully: Exhale completely and you should begin to sink slowly and in a controlled manner. If you sink rapidly, you are over-weighted. If you don’t sink, you are under-weighted.
- Adjust and Repeat: Add or remove weight in small increments (1-2 lbs) and repeat the process until the criteria are met.
- Log Everything: Once dialed in, record the final weight, undergarment thickness, tank type, and water type (salt/fresh) in your dive log. This is your new buoyancy architecture.
Freeflow: How to Breathe When Your Regulator Freezes in Cold Water?
In water hovering near freezing, the physics of gas expansion can turn your life support system against you. As high-pressure air leaves the tank and drops to ambient pressure in your second stage, it cools dramatically—a phenomenon known as the Joule-Thomson effect. This can cause any moisture in the system to freeze, forcing the valve open and causing a continuous, high-volume flow of air. This is a regulator freeflow. For the unprepared, it’s a moment of pure panic. For the disciplined diver, it’s a manageable incident.
Your first instinct—to rip the gushing regulator from your mouth—is the most dangerous. You would lose your only air source and likely inhale water. The key is breath control mastery. You must train yourself to “sip” air from the chaotic torrent. The objective is not to stop the freeflow, but to safely ascend using the air it provides while signaling your buddy and initiating a shared-air ascent if necessary. This is a critical emergency skill that must be practiced until it becomes muscle memory.
The following protocol is your immediate action drill. It should be visualized before every cold dive and practiced in a controlled environment with an instructor.
- Do Not Remove the Regulator: Keep the mouthpiece in. This is your air source.
- Tilt Your Head: Tilt your head to the right, allowing the force of the escaping air to exit from the left side of your mouth.
- “Sip” the Air: Do not try to seal your lips around the mouthpiece. Instead, use your tongue as a splash guard and gently “sip” breaths from the river of air flowing past your lips.
- Signal and Ascend: Immediately signal “out of air” to your buddy and indicate you need to ascend. Begin a controlled, shared ascent, ideally using their alternate air source. Your free-flowing regulator is now your backup.
- Switch to Redundant System: If you are carrying a pony bottle or other redundant air source, switch to it immediately while your buddy assists.
Lumpfish and Wolffish: What Marine Life Thrives in freezing temps?
One of the great rewards of braving the cold is discovering the unique and resilient life that flourishes where you’d least expect it. The cold, oxygen-rich waters of the Nordic seas are not barren; they are home to specialized creatures that have evolved remarkable strategies to survive. Two of the most fascinating characters you might encounter are the lumpfish and the Atlantic wolffish. These are not the fleeting, colorful fish of coral reefs, but stoic, powerful animals perfectly adapted to their harsh environment.
The lumpfish (Cyclopterus lumpus) is an almost spherical, slow-moving fish that looks more like a grumpy cartoon character than a marine animal. Their modified pelvic fins form a powerful suction cup, allowing them to anchor themselves to rocks and withstand strong currents. But their role in the ecosystem is vital. As noted by a marine life expert:
Lumpfish eat sea lice, a troublesome parasite that lives on farmed salmon and jeopardizes salmon populations.
– Tidepool Tim, Gulf of Maine Marine Life Information
The Atlantic wolffish, however, is a true testament to cold-water adaptation. Its survival strategy is a marvel of biochemistry, a perfect example of why this environment is so unique.
Case Study: The Atlantic Wolffish’s Natural Antifreeze
The Atlantic wolffish (Anarhichas lupus) is a master of extreme cold survival. It thrives in water temperatures that would be lethal to other species, often between -1 to 11°C. According to research from organizations like Oceana, its secret lies in its blood, which contains a high concentration of natural antifreeze compounds. These glycoproteins prevent ice crystals from forming in its cells, allowing it to remain active on the hard ocean floor at depths up to 500 meters. As a benthic predator, it uses its powerful jaws to crush hard-shelled prey like crabs and sea urchins, playing a critical role in maintaining the balance of the seafloor ecosystem.
The Surface Interval: How to Regain Body Heat Safely After a Dive?
Your dive is not over when you surface. For the cold-water diver, the surface interval is a critical phase of your thermal safety protocol. Even in a dry suit, your body loses heat over the course of a dive. The most significant danger occurs after you exit the water, a phenomenon known as “afterdrop.” As you stand on the boat or shore, cold blood from your extremities (which were vasoconstricted to protect your core) begins to circulate back, causing your core body temperature to drop further. This can lead to violent shivering and even mild hypothermia if not managed correctly.
The common instinct to immediately drink a hot beverage is a mistake. Introducing intense external heat can interfere with the body’s natural rewarming process. The priority is to stop further heat loss and allow the body to re-establish equilibrium gently. This requires a disciplined, step-by-step procedure. You must be as methodical in your post-dive routine as you are in your pre-dive checks. You can get hypothermia in a dry suit if you mismanage your surface interval, so treat this protocol with the seriousness it deserves.
The following checklist, based on guidelines from expert organizations like the Divers Alert Network, outlines the correct sequence for safe rewarming and preventing afterdrop. Commit this to memory.
Checklist for Post-Dive Warming Protocol
- Exit the Elements: As soon as you are out of the water, move to a sheltered area out of the wind.
- Remove Wet Gear Immediately: Your wet gloves, hood, and the exterior of your suit are actively cooling you. Remove all wet gear as quickly as possible.
- Dry Off Completely: Towel off thoroughly. Removing all moisture from your skin and hair is a critical step to stop evaporative cooling.
- Layer Up with Dry Clothes: Put on dry, insulating layers of clothing, starting with a moisture-wicking base layer. A warm hat is essential, as significant heat is lost through the head.
- Introduce Gentle Warmth: Only after you are dry and dressed, consume a warm (not scalding hot), non-alcoholic, sugary drink to provide your body with fuel to generate its own heat.
Winter vs Summer: Is Visibility Better in the Coldest Months?
One of the most counter-intuitive truths of diving in temperate regions is that the coldest months often offer the most breathtaking visibility. While a summer dive might be comfortable, it can also be a swim through a murky, green haze. A winter dive, though demanding, can reward you with water so clear it feels like you are flying through air. This dramatic improvement in clarity is not an anomaly; it’s a direct result of cold-water biology.
The primary culprit for poor visibility in summer is plankton and algal bloom. When the water is warm and sunlight is abundant, these microscopic organisms reproduce exponentially, creating a soupy suspension that scatters light and reduces visibility to just a few feet. In winter, two factors combine to create pristine conditions. First, the lower angle and intensity of the sun, combined with colder water temperatures, dramatically inhibit the growth of this plankton. The water column essentially clears itself.
Second, the die-off of seasonal aquatic plants and algae means fewer suspended organic particles in the water. The result is a stable, clear water column where light can penetrate deeply, creating dramatic sunbeams and an almost unlimited sense of space. For wreck divers and photographers, this is the holy grail. A shipwreck that is a vague silhouette in August can become a sharp, detailed vista in February, with every feature visible from a distance.
Why Is the Baltic Sea Less Salty and How Does It Affect Your Swim?
Diving in a unique environment like the Baltic Sea introduces another variable into your buoyancy architecture: salinity. Experienced divers know that you need more weight to sink in saltwater than in freshwater because salt increases water density. The Baltic Sea is one of the largest bodies of brackish water in the world, creating a diving experience that is different from both ocean and lake diving.
The Baltic’s low salinity is due to two main factors: high freshwater runoff and limited exchange with the ocean. It is fed by over 200 rivers, which pour enormous volumes of freshwater into the basin. Its only connection to the saltier North Sea is through the narrow and shallow Danish straits, severely restricting the inflow of saltwater. As a result, the average surface salinity of the Baltic Sea is dramatically lower than that of the world’s oceans. According to marine science data, its salinity ranges from 0.3% to 0.9%, a fraction of the typical 3.5% found in the Atlantic.
For a diver, this has a direct and measurable effect on weighting. The water is less dense, and therefore provides less buoyant support. This means you will need significantly less weight than you would for an ocean dive with the same equipment. For example, a diver who is perfectly weighted for a Mediterranean dive (approx. 3.8% salinity) would be dangerously over-weighted in the central Baltic (approx. 1.5% salinity). The adjustment can be as much as 1.2 kg (about 2.6 lbs) or more. Once again, this underscores the absolute necessity of performing a systematic weight check whenever you dive in a new body of water with different characteristics.
The Ærøsund: Is This Purpose-Sunk Wreck Good for Beginners?
The ferry M/F Ærøsund, scuttled in the waters south of Funen in Denmark, serves as a perfect example of a wreck that is highly accessible to newly certified cold-water divers. When evaluating a wreck for “beginner” suitability, especially in a dry suit, we look for several key factors, and the Ærøsund ticks all the boxes. It represents an ideal training ground for developing fundamental wreck diving skills.
First and foremost is its depth. The ferry rests upright on the seabed with its main deck at approximately 18-19 meters. This is well within the limits of an Open Water Diver certification and, crucially, provides a generous amount of no-decompression time. This reduces the task loading on a diver who is already managing new buoyancy skills in a dry suit. There is ample time to explore without the added stress of managing decompression obligations.
Second, it was sunk with divers in mind. The vessel was thoroughly “cleaned” before sinking, meaning hazardous materials were removed and, most importantly, potential entanglement risks were minimized. Doors were removed and passages were cleared to create safe “swim-throughs” that give the feeling of penetration without the risks of becoming trapped in a complex interior. A beginner can practice controlling their buoyancy while navigating through the large, open car deck without fear of silt-out or getting caught on unseen cables. The wreck is large and intact, offering plenty to see without needing to enter any confined overhead environments, which would require advanced wreck training.
Key Takeaways
- Discipline Over Gear: Your safety in cold water depends more on your adherence to strict protocols for weighting, emergencies, and thermal management than on the brand of your equipment.
- Buoyancy is Built, Not Guessed: Treat every dive with new undergarments or in different water types as an opportunity to rebuild and verify your buoyancy architecture with a systematic weight check.
- Drill for Reality: An emergency like a regulator freeflow is survivable only through muscle memory. Practice the “sip-breathing” protocol until it is an automatic, calm response.
The Wrecks of the Øresund: Which Ships Can Recreational Divers Visit?
The Øresund, the narrow strait separating Denmark and Sweden, is a historic maritime channel littered with centuries of naval history resting on its seabed. For the recreational diver, it offers a fascinating underwater museum, but access is strictly governed by your training and experience. The wrecks can be broadly categorized into two groups: those suitable for recreational sport divers and those that fall firmly into the realm of technical diving.
For a diver with an Advanced Open Water certification and dry suit experience, numerous wrecks are accessible. These are typically located in the 18 to 40-meter range. Many are old wooden cargo ships or smaller vessels that pose minimal penetration or entanglement hazards. A diver can safely explore the exterior, observing the structure and the abundant marine life that has colonized it, such as cod and conger eels. The key is that these dives do not require planned decompression stops and do not involve entering an overhead environment. The dive plan is simple: descend, explore the exterior for the planned bottom time, and ascend directly to the surface.
The second category of wrecks is for technical divers only. These include deeper wrecks lying below 40 meters, large and complex vessels with intricate interiors, or those in high-current areas. Exploring these sites requires specialized training such as Advanced Nitrox, Decompression Procedures, and specific Wreck Penetration certifications. These divers carry redundant gas supplies (doubles or sidemount), plan and execute staged decompression stops, and use guidelines and advanced navigation techniques to safely penetrate the wreck’s interior. Attempting to dive these sites without the requisite training and equipment is exceptionally dangerous. The transition from a recreational wreck diver to a technical one is a long and rewarding journey, but it must be done through proper, disciplined training.
By internalizing these protocols—from meticulous preparation on the surface to disciplined execution in the water—you transform the challenge of cold water from a source of anxiety into a platform for mastery. Your gear is just a tool; your disciplined mindset is your ultimate life support.