Yes, you can see the Northern Lights from Denmark, but they are a spectacle your camera will appreciate far more than your naked eye.
- Success depends less on high Kp-indices and more on monitoring real-time solar wind data (like a negative Bz value) and having a clear northern horizon.
- Your best chance is from an officially certified Dark Sky location like Møn, which minimizes the light pollution that masks the faint auroral glow.
Recommendation: Treat it as a scientific celestial hunt. Your patience will be rewarded not just with a potential aurora, but with other stunning phenomena like the Milky Way, noctilucent clouds, and bioluminescent plankton.
The dream of seeing the aurora borealis—a silent, ethereal dance of green and purple light across the night sky—is a powerful one. For many hopeful skywatchers in Denmark, this dream is often met with a frustrating question: is it even possible this far south? The common advice is a litany of maybes: go north to Skagen, find a perfectly clear night, and hope for a once-in-a-decade solar storm. This often leads to disappointment, with many concluding that a trip to Norway or Iceland is the only real solution.
But what if the problem isn’t the aurora, but our perception of it? As an astrophotographer, I’ve learned a fundamental secret to hunting celestial phenomena from lower latitudes. The truth is, seeing the aurora from Denmark is rarely about witnessing a vibrant overhead display. It is an exercise in revealing what is hidden. It requires shifting your mindset from that of a casual observer to that of a scientific hunter, armed with the right tools and knowledge. The most important of these tools isn’t a telescope, but your camera, an instrument with a photonic sensitivity that far surpasses the human eye.
This guide will recalibrate your expectations and transform your approach. We will move beyond simplistic forecasts to decode the real science that predicts a Danish aurora. We will explore the country’s dark-sky sanctuaries, understand the crucial difference between what your eyes perceive and what a long-exposure photograph captures, and discover the other magnificent, faint-light phenomena that make a night out under the Danish sky a rewarding experience, aurora or not. This is not just a guide to seeing the lights; it’s an invitation to a grander celestial hunt.
To navigate this celestial hunt, this article breaks down the essential knowledge you need. From understanding the complex science of aurora prediction to discovering the best locations and techniques, each section will equip you with the practical expertise of an astrophotographer.
Summary: A Guide to Denmark’s Celestial Hunt
- Kp-Index: How to Read the Forecast to Predict Northern Lights?
- Tisvildeleje or Møn: Where Are the Darkest spots on Zealand?
- Long Exposure: Why Do the Lights Look Better on Camera Than to the Eye?
- Mareild: When Can You See Bioluminescent Plankton in Danish Waters?
- The Blue Hour: Why Is Twilight So Long and Blue in Scandinavia?
- ISO Settings: How to Capture Wildlife Shadows Without a Flash?
- Dark Sky Park: Why Is Møn the Best Place to See the Milky Way?
- Midnight Sun vs White Nights: What Will You Experience in Denmark?
Kp-Index: How to Read the Forecast to Predict Northern Lights?
The first tool most aspiring aurora hunters encounter is the Kp-index, a scale from 0 to 9 that measures geomagnetic activity. While a high Kp value (Kp 5 or above) is a good starting indicator for Denmark, relying on it alone is a common mistake. The Kp-index is a planetary average, a blunt instrument for a nuanced task. For a low-latitude aurora hunt, you must become a more sophisticated reader of space weather, focusing on the real-time data that signals an imminent display, not a three-day-old prediction.
The true keys are found in the solar wind data. The three most critical parameters are the Bz value (the north-south direction of the Interplanetary Magnetic Field), solar wind speed, and density. A strongly negative Bz value is the master switch; it allows solar particles to connect with Earth’s magnetic field and pour into the atmosphere, creating the aurora. When you see Bz tilt sharply southward, combined with high wind speeds (ideally over 500 km/s), your chances increase dramatically, even if the overall Kp-index is only moderate. These conditions are what can cause the auroral oval to expand southward. For context, at Kp=0, the aurora oval sits at ~66° magnetic latitude, but with each level increase, it pushes further south, making a G3 storm (Kp 7) potentially visible on the Danish horizon.
This means shifting from passive app-watching to active data monitoring. Use resources like the NOAA Ovation 30-minute forecast, which provides a nowcast based on live data from the DSCOVR satellite. This gives you a 30 to 90-minute heads-up, which is far more actionable than a multi-day Kp forecast. It’s the difference between hoping for the best and making a data-driven decision to head out.
Your Action Plan: Beyond Kp-Index for Low-Latitude Aurora Hunting
- Access Real-Time Solar Wind Data: Monitor Bz (southward negative values are key), solar wind speed (>500 km/s is ideal), and density from the DSCOVR satellite, which provides a 30-90 minute forecast lead time.
- Use NOAA Ovation 30-Minute Nowcast: Switch from 3-day Kp forecasts to the Ovation model’s real-time nowcast, which provides actionable intelligence based on current solar wind conditions.
- Interpret the Viewline for Denmark: During G3/Kp7+ storms, check if the aurora oval’s southern edge (the viewline) extends down to Denmark’s latitude (55-57°N) using the NOAA Aurora Viewline product.
- Watch for Substorm Indicators: Monitor for sharp, sudden drops in the Bz value as signs of imminent localized substorms that can cause brief, intense displays on the horizon.
By learning to read these primary sources, you transform from a hopeful spectator into an informed hunter, capable of identifying the precise, fleeting moments when the aurora might grace the Danish sky.
Tisvildeleje or Møn: Where Are the Darkest spots on Zealand?
Finding a truly dark sky is non-negotiable for any form of astrophotography, and it’s especially critical when hunting for a faint auroral glow on the horizon. In Denmark, light pollution from cities like Copenhagen can wash out the sky for miles. While many North Zealand locations like Tisvildeleje offer a good northward view over the sea, one location stands in a class of its own: the island of Møn.
Møn isn’t just dark; it’s officially recognized for its darkness. In 2017, Møn and the adjacent island of Nyord became the world’s first location to be simultaneously certified as an International Dark Sky Park and a Dark Sky Community. This dual Gold-Tier designation by the International Dark-Sky Association is a testament to the area’s commitment to preserving natural darkness. For an aurora hunter, this has two profound implications: minimized light pollution and a community that understands and protects the night sky.
The key to a successful Danish aurora observation is not just darkness, but an unobstructed northern horizon over water. The lights, if they appear, will be low, often just a faint arc or subtle pillars of light. Locations on the northern coasts of Møn, Falster, or even the northern tip of Jutland (Skagen) provide this critical vantage point. However, Møn’s certified darkness gives it the edge, reducing the background “sky glow” and increasing the signal-to-noise ratio, making it easier for both your eyes and your camera to detect the faint auroral signal.
While other coastal areas can work during a strong storm, Møn offers the highest probability of success by providing the darkest possible canvas for the faint light of the aurora to appear.
Long Exposure: Why Do the Lights Look Better on Camera Than to the Eye?
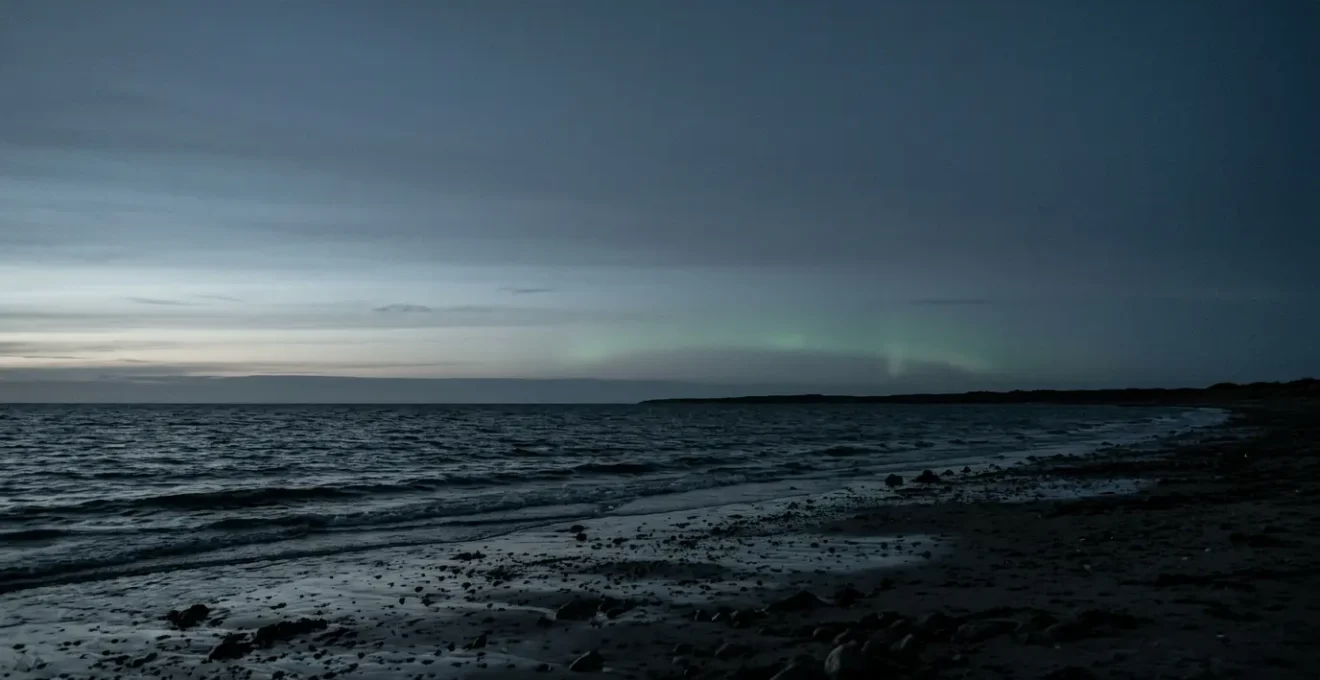
This is perhaps the most important concept for a Danish aurora hunter to grasp, as it manages expectations and redefines success. The breathtaking, vibrant green and purple auroras you see in photos from Denmark are almost always a product of long-exposure photography. To the naked eye, a typical Danish aurora will likely appear as a faint, colorless, or subtly greenish-grey arc or shimmering haze low on the northern horizon. The reason for this dramatic difference lies in the biology of our eyes versus the technology of a camera sensor.
Our retinas contain two types of photoreceptor cells: cones and rods. Cones are concentrated in the center of our vision, detect color, and work best in bright light. Rods, which dominate our peripheral vision, are incredibly sensitive to low light but are essentially colorblind. In fact, research shows that human rod cells are approximately 1,000 times more sensitive to light than cone cells. When viewing a faint aurora, it’s primarily our rods that are doing the work, which is why the phenomenon appears as a ghostly white or grey glow. We simply don’t have enough light hitting our retinas to activate the color-sensing cones.
A camera sensor, however, has no such limitation. During a long exposure (typically 5-20 seconds), the camera’s shutter remains open, continuously collecting photons. It accumulates all the faint light from the aurora onto the sensor, building up an image that is far brighter and more colorful than our eyes could ever perceive in a single instant. The sensor can “see” the distinct green (from oxygen atoms) and red/purple (from nitrogen atoms) wavelengths that are too faint for our cones to register.
The Photographer’s Aurora Perception Study
To illustrate this, astrophysicist Darren Baskill documented his own aurora observation from the UK, a similar low-latitude environment. He created three versions of the same photo: the unprocessed original, a processed version with enhanced color, and a third version adjusted to represent what his naked eye actually saw. The result was a powerful demonstration that even from mid-latitudes, cameras reveal vibrant colors that are completely invisible to the human eye viewing the exact same scene.
Therefore, your camera is not just for documenting the memory; it is your primary tool for observation. Trust your camera’s LCD screen more than your eyes. If you see a faint, structured cloud to the north that doesn’t seem to be moving, take a long exposure shot. You might be shocked to see it light up green on your screen.
Mareild: When Can You See Bioluminescent Plankton in Danish Waters?
The celestial hunt in Denmark extends beyond the sky and into the sea. One of the most magical and accessible phenomena is “Mareild,” the Danish term for the blue-green sparkle of bioluminescent plankton, specifically the species Noctiluca scintillans (sea sparkle). This natural light show occurs when the plankton are disturbed, releasing a flash of light as a defense mechanism. For the patient sky-watcher waiting for an aurora, discovering Mareild in the waves at their feet can be an equally rewarding experience.
The key to finding Mareild is knowing when and where to look. While it can be seen throughout the warmer months, the peak season is typically in late summer and early autumn (August and September). This is when water temperatures are at their highest, promoting large blooms of the plankton. Happily, this window perfectly overlaps with the beginning of the prime aurora season, as the nights grow longer and darker. This alignment creates a unique “double hunt” strategy, where you can scan the northern horizon for auroras and the shoreline for bioluminescence simultaneously.
To see the glow, the water needs to be agitated. You can trigger it by skipping stones across the surface, wading slowly in the shallows, or simply watching the wake of a boat or kayak. On a calm night, every splash and ripple will erupt in a shower of ethereal blue light. The best conditions are warm, calm nights following a few days of sunshine, which encourages the plankton to photosynthesize and multiply near the surface. Local nature-focused Facebook groups are often the best source for real-time sighting reports.
Your Action Plan: Strategic Guide to Mareild Hunting in Denmark
- Optimal Season: Target late summer to early autumn (August-September) when water temperatures are warm and plankton blooms peak. This window enables a “double hunt” strategy with the start of aurora season.
- Trigger Techniques: Use mechanical stimulation to activate the glow. Skip stones, wade through shallow areas, or observe kayak wakes to see the characteristic blue-green sparkle.
- Predictive Monitoring: Look for recent sunny spells (2-3 days) that promote plankton photosynthesis, check local Facebook nature groups for real-time sighting reports, and choose calm nights with minimal wind.
- Safety Identification: Distinguish benign Noctiluca scintillans from potentially harmful algal blooms by checking for foul odors, discolored water during the daytime, or local water quality warnings before interaction.
Like the aurora, Mareild is a phenomenon of faint light that requires darkness and patience to appreciate, reinforcing the idea that Denmark’s nights are full of hidden wonders for those who know how to look.
The Blue Hour: Why Is Twilight So Long and Blue in Scandinavia?
Every astrophotographer lives for the “blue hour,” that magical period of twilight after sunset or before sunrise when the sky is filled with a deep, saturated blue. In Scandinavia, and by extension Denmark, this phenomenon is particularly special. The blue hour here feels prolonged, stretching out and creating a unique, moody atmosphere that is a photographic opportunity in itself. This extended twilight is a direct consequence of Denmark’s high latitude.
The duration of twilight is determined by the angle at which the sun sets. Near the equator, the sun descends almost perpendicularly to the horizon, so the transition from day to night is swift. However, astronomical observations confirm that at Denmark’s latitude (54-57°N), the sun sets at a much shallower angle. This means it spends a significantly longer time journeying through the different stages of twilight, specifically when it is between 6 and 18 degrees below the horizon. The blue hour occurs when the sun is just far enough below the horizon that its direct light is gone, but its rays are still scattering through the upper atmosphere.
This scattering effect, known as Rayleigh scattering, is what makes the sky blue during the day, as it scatters blue light more effectively than red light. During the blue hour, this effect is intensified. The longer red wavelengths pass by into space, while the upper atmosphere is still illuminated by and scatters the beautiful, indirect blue light down to us on the ground. The result is a pure, monochromatic, and deeply atmospheric light that is perfect for capturing coastal landscapes and minimalist scenes.
For the celestial hunter, the extended blue hour is both a challenge and an opportunity. It means a longer wait for true astronomical darkness needed for auroras and the Milky Way, but it also provides a stunningly beautiful window to capture the Danish landscape in a light that is quintessentially Scandinavian.
ISO Settings: How to Capture Wildlife Shadows Without a Flash?
The skills honed while hunting for the faint light of the aurora are directly transferable to another challenging and rewarding nocturnal pursuit: wildlife photography without a flash. Just as with the aurora, the goal is to work with the scarce available light, not overpower it. Using a flash is not only disruptive and unethical, potentially startling or blinding an animal, but it also creates harsh, unnatural-looking images. The art lies in capturing the atmosphere of the night and the creature’s presence within it, often as a silhouette or a ghostly shadow.
To achieve this, you must push your camera’s light-gathering capabilities to their limit, a technique familiar to any astrophotographer. This means using a very high ISO setting, typically in the 3200 to 12800 range, to make your sensor extremely sensitive to light. This is paired with the widest possible aperture on your lens (f/2.8, f/1.8, or even wider) to let in the maximum number of photons. The trade-off is increased digital “noise,” but a grainy, atmospheric shot of an animal in its natural nighttime environment is far more powerful than a sharp, flash-lit snapshot.
Focusing is another major challenge, as autofocus systems fail in near-total darkness. The solution is to switch to manual focus and adopt a pre-focusing strategy. Identify likely points of activity—a game trail, a forest edge, a water source—and focus on that spot in advance. Then, you wait patiently for your subject to enter the plane of focus. This requires the same patience and location knowledge demanded by aurora hunting. The same dark, remote locations you choose to escape light pollution for astrophotography are also the best places to find undisturbed nocturnal wildlife.
Your Action Plan: Nocturnal Wildlife Photography Settings
- Maximize Light Gathering: Set ISO to the 3200-12800 range and use the widest available aperture (f/2.8 or wider) to capture movement without a flash.
- Pre-Focus Strategy: Switch to manual focus and pre-focus on known distance points (like forest edges or water sources) where animals are likely to appear.
- Leverage Aurora Location Skills: Apply the same patience and dark location selection used for aurora hunting. Areas with minimal light pollution are optimal for both pursuits.
- Ethical Shadow Approach: Use a red-light headlamp for setting up your camera to protect animals’ night vision. Aim to capture silhouettes or shapes rather than perfectly lit portraits.
By applying these techniques, you’re not just taking a picture of an animal; you’re capturing the essence of the night itself, using the same principles of faint-light observation that guide the entire celestial hunt.
Dark Sky Park: Why Is Møn the Best Place to See the Milky Way?
While the aurora is an unpredictable visitor, the Milky Way is a reliable and breathtaking spectacle available from Denmark for much of the year, provided you can find a dark enough sky. Once again, the certified Dark Sky Park on Møn emerges as the undisputed champion for this celestial endeavor. The same lack of light pollution that makes it ideal for aurora hunting allows the faint, collective glow of billions of stars in our galactic core to shine through with stunning clarity.
Under a typical suburban sky, you might see a few hundred stars. On Møn, that number explodes. According to Dark Sky Møn observations, on a clear, moonless night, visitors can observe up to 5,000 stars with the naked eye. This is the difference between seeing a few constellations and seeing the grand structure of our galaxy stretching across the sky. The bright, dense galactic core of the Milky Way is best viewed from Denmark between April and September, when it arcs across the southern sky. A visit to Møn during this period offers one of the most awe-inspiring astronomical sights possible from this latitude.
Møn’s status is not an isolated achievement but the cornerstone of a growing national movement. This commitment to preserving darkness elevates the entire country’s potential for astrotourism and night-sky appreciation.
Denmark’s Expanding Dark Sky Network
Following the pioneering certification of Møn and Nyord in 2017, Denmark is actively expanding its network of protected night skies. Dark Sky Parks are now being developed on the islands of Mandø and Anholt, and in the village of Taarup on Funen. These efforts, alongside the exceptional natural darkness found in Thy National Park, demonstrate a nationwide commitment to protecting the night sky not just for astronomical observation, but also for the benefit of nocturnal biodiversity.
For any celestial hunter in Denmark, a pilgrimage to Møn is essential. It provides the best possible conditions to witness the grandeur of the cosmos, whether your target is the elusive aurora or the magnificent sweep of the Milky Way.
Key Takeaways
- Danish auroras are primarily a photographic phenomenon, often appearing as a faint grey glow to the naked eye.
- Success requires moving beyond the Kp-Index to monitoring real-time solar wind data (especially a negative Bz) and securing a clear, dark northern horizon.
- Møn’s certified Dark Sky Park offers the best conditions in Denmark for all astrophotography, dramatically increasing your chances of capturing faint celestial objects.
Midnight Sun vs White Nights: What Will You Experience in Denmark?
A common point of confusion for visitors to Scandinavia is the nature of the summer sun. While countries further north experience the “Midnight Sun,” where the sun never sets, Denmark’s reality is different but equally unique. It’s crucial for any sky-watcher to understand this distinction, as it completely dictates what you can (and cannot) see during the summer months. Denmark does not have the Midnight Sun; instead, it experiences “White Nights” or Lyse Nætter.
This phenomenon, which peaks around the summer solstice in June and early July, means the sun never dips far enough below the horizon for the sky to become truly dark. As clarifying a common misconception, Denmark’s summer nights are characterized by a persistent astronomical twilight that lasts from sunset to sunrise. While beautiful, this constant twilight makes observing faint deep-sky objects like the Milky Way or the aurora borealis completely impossible during these months. The sky simply never gets dark enough for them to be visible.
However, this apparent disadvantage for astrophotography gives rise to an opportunity to hunt for a different, and arguably rarer, celestial phenomenon: Noctilucent Clouds (NLCs). These are the highest clouds in Earth’s atmosphere, forming at extreme altitudes of 76-85 km in the mesosphere. Composed of tiny ice crystals, they are only visible during summer twilight at high latitudes. They appear as intricate, silvery-blue, wave-like structures glowing in the sky, typically 30-60 minutes after sunset or before sunrise, low on the northern horizon. The very twilight that washes out the stars is what illuminates these high-altitude clouds from below, making them shine with an eerie, electric blue light.
Your Action Plan: Hunting for the Alternative Summer Sky Phenomenon, Noctilucent Clouds
- Understanding NLCs: These are rare, electric-blue, high-altitude ice clouds visible ONLY during twilight in the summer months (May-August) at latitudes above 50°N, making them a perfect Denmark summer sky-hunting prize.
- Optimal Viewing Time: Look toward the northern horizon 30-60 minutes after sunset or before sunrise, when the sun is 6-16° below the horizon. They appear as silvery-blue, web-like structures.
- Why They’re Visible in White Nights: NLCs are illuminated by sunlight from far below the horizon. The same persistent twilight that blocks stars is what makes these unique clouds visible.
- Photography Advantage: Unlike auroras, NLCs photograph beautifully during civil and nautical twilight, turning Denmark’s summer “disadvantage” (no dark nights) into a unique photographic opportunity.
This transforms the bright summer nights from a period of waiting into an active season for a different kind of celestial hunt. So, pack your camera, find your darkness, and begin your own celestial journey. The Danish sky holds more secrets than you can imagine, waiting patiently to be revealed.